Avisynth3D is a program for adjusting stereo clips. The result is Avisynth script which can be viewed or imported by many program packages.
Here is short tutorial how to create simple script for anaglyph output from two video clips (one left and the other one right). Very short source video clips (3 frames each) can be downloaded from:
http://www-e2.ijs.si/damir.vrancic/personal/trv900/sync/files/Fountain_Canop_L1.avi (left file)
http://www-e2.ijs.si/damir.vrancic/personal/trv900/sync/files/Fountain_Canop_R1.avi (right file)
and codec on Canopus site or here (read-only codec).
First, Avisynth3D, *.avt and *.avp files should be placed in Avisynth directory (avisynth 2.5.5 should be installed, first). Then plugins (dlls) should be placed in Avisynth plugin directory.
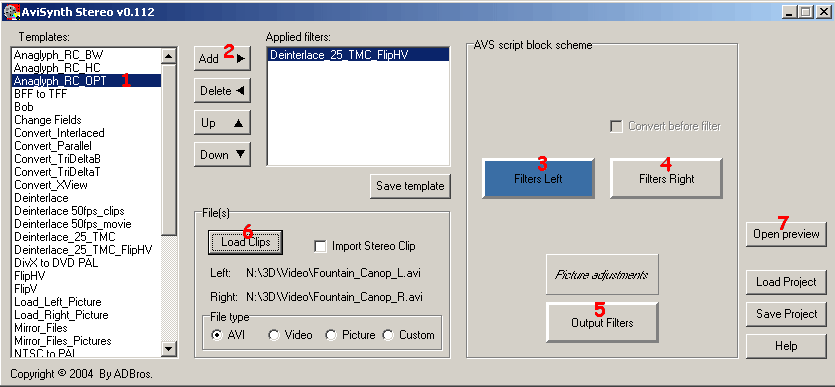
Start Avisynth3D. The screen is shown below:

Click "deinterlace_25_TMC_FlipHV" in Templates window (1). Make sure that "Filters Left" block is painted blue in "AVS script block scheme" (3). If not, click on "Filters Left". Then press "Add" (2) in order to add filter for deinterlacing (you can see and edit avs script for each template in "Templates" window (1) by pressing right mouse button). Why have we chosen "deinterlace_25_TMC_FlipHV" instead of "deinterlace_25_TMC"? Since left video clip is taken by camcorder turned upside-down and we have to flip picture :-).
Now click "Filters Right" (4), choose "deinterlace_25_TMC" in (1) and click "Add" (2). Then click "Output Filters" (5), click "Anaglyph_RC_OPT" (1) [for anaglyph output] and "Add" (2).
We have now selected all required filters. Now we can save project settings if we want by pressing "Save Project" (button in right-down part of the window). Let us now load our clips by clicking "Load Clips" (6). First we select left video file, then right one.
Now we can see result by clicking "Open preview" button.
The following window appears:

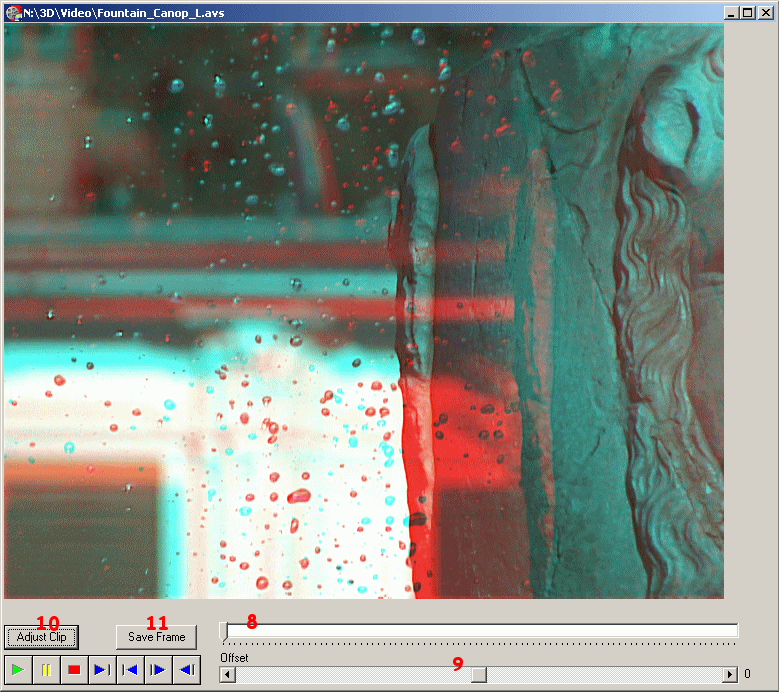
We can preview our file by changing slider position (8). If left and right clips are not synchronised, they can be adjusted by changing "Offset" slider (9). Current frame can be saved as bmp file by pressing "Save Frame" button (11). Since clip is not "perfectly adjusted", first it should be adjusted. So, select desired frame by slider (8) and then click "Adjust Clip" button (10). The following two windows appear:


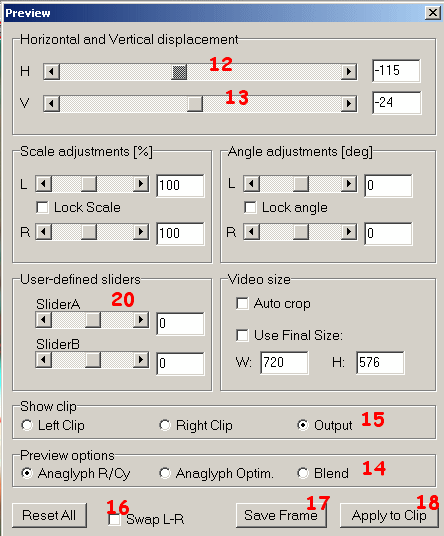
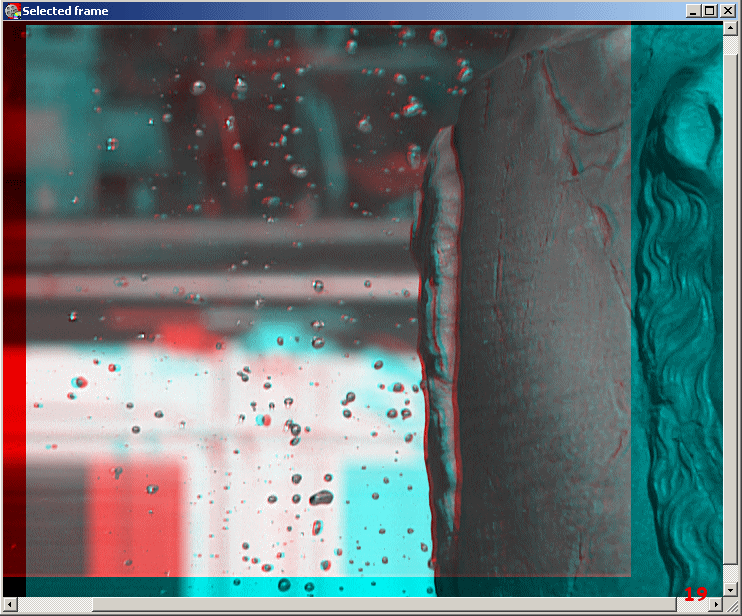
First, resize or scroll the frame (19) and then use horizontal or vertical scrollbar to adjust both clips (12, 13). You can choose between different preview options by pressing "Anaglyph R/Cy", "Anaglyph Optim." or "Blend" (14). You can also see left and right clips alone by choosing "Left Clip" or "Right Clip" (15). If required, left and right channels can be swapped by clicking "Swap L-R". Current frame can be saved as bmp file by pressing "Save Frame" button (17). Then settings can be applied to video clip by pressing "Apply to Clip" button (18). The output avs script is then adjusted and shown in the previous window.
User-defined sliders can be used as well (20). If we use word SliderA or SliderB (use two capital letters as denoted) within avt scripts (1), then both words are replaced by actual values of SliderA and Slider B (20). Range and resolution can be adjusted by clicking on slider with right mouse button.
Similarly, "reserved words" are also FileL and FileR, when "custom" file type is chosen in first Avisynth3D window (below "Load Clips" (6)). They are replaced by actually loaded files (just in Import left and Import right Filters which appear after clicking "custom" file type).
This is very short introduction to Avisynth3D. Soon there will be some more info...